Wednesday, April 25, 2012

Photos - Life's Embellishments

Wow, time has a way of flying by when you're having fun! Well, the past few days haven't been exactly fun, but, they are behind me now so. . . on to better things! Right? I'm feeling the need to embellish quite strongly today and will soon have to give in to it! I have been scanning my family's slides and have been enjoying my trips down memory lane along with some side trips of my parents. What has been most surprising is the quality of the slides that are more than 60 years old! The colors are still lovely and the scenes are remarkable. Here's a shot taken in Brooklyn, NY after the major snowstorm in December 1948: Nice hats! 
My dad is the guy in the snow holding up my cousin who was 3 at the time. My parents lived in Connecticut but were home visiting for the holidays. Who would have guessed that they would be in store for a week's stay! Aren't the colors still great? I love color!!!!

How about this shot of Niagara Falls from my parents' honeymoon in October 1947, how majestic:

These are the rough copies before any clean-up of dust etc. but I love them just the same. Photos embellish your life as well as record its moments. How wonderful to be able to really look back and see what was seen during another moment in time. They say that time waits for no man but we have photographs to freeze our special moments and I'm ever grateful that I do!

I'm finding inspiration for recording my family's life journey with each box of stray photos I review and will see where they take me in the coming months. I'm afraid that the quality of most of my photos is not the greatest. The 60's and 70's with their Instamatic cameras with cheap lenses, square photos and less than ideal processing have not been kind to memory lane. Tons of orange and bluish - greenish photos filled my photo albums or got that way over time. The albums themselves, were destructive if the magnetic pages were made from the wrong stuff. Who knew? Anyway, I digress. The memories are intact, if not the photos. Thank goodness we have so many ways to "fix" some of the mistakes we made. Now I wish that more of my early married life was documented in slides. They at least, have withstood the test of time. I am blessed with a good memory and each set of pictures or slides that I scan, brings back a rush of memories of happy times and special people who have colored my life. I hope and pray to have them recorded in some way, so that future generations can enjoy visiting the past, see the ancestors and revel in the warmth of family connections.

Next stop  . . . a few recent scrapbook pages created by me to remember Christmas 2007. Stay tuned if you're curious . . . 

Have a sparkling day!!!!


Do you use photos and films to embellish your life too? I am interested in how they affect you too. Please leave a comment!


Thursday, April 19, 2012

Up Next - Scrapbooking Pocket Albums

I've been pondering my next post, maybe too hard and long, but have come to the conclusion that anything new is better than nothing at all! I guess I'm more of a Nervous Nellie regarding this blog than I should be and I need to try to focus on what I love. I love scrapbooking! My next topic will be what I call a pocket memory album. 
 When you have a special event such as a baby shower, bridal shower or  momentous birthday celebration, there are so many items that can be saved as mementos. It is fairly easy to save photos in an album. Or, you can be a bit more creative and make a scrapbook for your photos and cards. However, it can be difficult to read handwritten sentiments, or save that cake topper or other favor and not lose track of it. Roughly a year ago, I was delighted to learn about making pocket albums from a scrappy friend and now I'm hooked! 
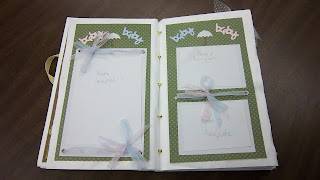
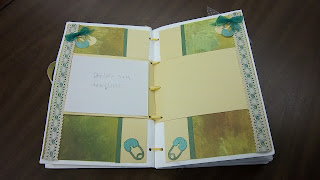
  Pocket Albums are simple to make and afford you lots of creativity! The best part is that you control how many pages/pockets that it has, as well as, how big to make it! For this blog I will show you 3 different albums I have made. All were made for baby showers but were unique in their own right. One was for a baby shower where the expectant parents did not want to know the sex of their baby (A), one was for a baby boy (B) and the last for a baby girl (C).
 I used the shower invitations to help me select my color palettes and also, where I found appropriate papers, my page themes.  In the interest of longevity, I selected Tyvek envelopes over paper ones because they are so difficult to tear. Hopefully, they will stand the test of time and usage. The size of the envelope that I preferred was 10" X 13", however, there is no set size to use. The 10" X 13" envelope works out well for storing the larger cards (5"x7") because once you fold them in half, the pages/pockets are 6.5" X 10".  Using 4 or more envelopes, folded in half with the sticky flap cut off, I decorated each page/pocket. I tried to keep about half an inch from the fold clear to allow for punched holes for the ribbon that would bind them together. The pages that became pockets for memorabilia or cards were more stable when I used heavier double-sided papers. To adhere the paper to the Tyvek I chose 1/4" Terrifically Tacky Double-sided tape and applied it to the edges of the paper. On some of the pages I used Xyron's Cheetah (2" and 4" permanent) to apply adhesive on pretty much the whole page for a strong bond. Each envelope provides 1 side that is sealed and one side that is open when folded in half. Be sure to design your pages, keeping in mind the placement of the pockets. I found it easier to place things into the pockets if they were alternated with the sealed pages except for the last page. I tried to keep the pocket side on the inside and not have it be the back page.   To make designing the pages easier, I trimmed the flaps off of all envelopes, then folded them in half and stacked them one on top of the other keeping the pockets alternated. I decorated the pages in order and then punched 5 holes through 2 envelopes at a time using my Crop-o-dile Big Foot. I used the large hole punch and placed the holes equidistant (1" from top and bottom, 3" from top and bottom and in the middle.) Using 3 yards of sturdy ribbon - I like to use grosgrain - lace the pages together criss-crossing between the holes. Start at the top (or bottom) and after lacing to the end slide the ends back up to the middle to be able to wrap them around the album a couple of times to secure the contents. 
I hope these notes are good enough for you to follow. I'm slowly learning how to write down directions so please let me know if they need more clarification! I hope the pictures make them easier to understand.  
Here's (A)


I tried to provide templates for cutting pictures to the proper size on the page.

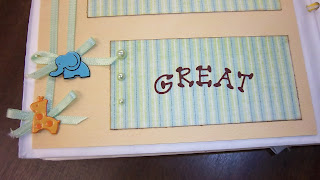
Here's (B) :


Pockets can be used to hold cards and notes, extra photos, streamers, favorite wrapping papers, etc. And last but not least, (C) :


I would love to hear from you so please drop a note! It's been fun sharing my passion for memories and fun ways to preserve them!
See you next time and have a sparkling day!


Saturday, April 14, 2012

Show and Tell April 2012

Now that I am getting the hang of blogging, I am beginning to enjoy it! I promised to share some of my newer non-paper oriented projects I have done so here goes:


I took up May Arts' Candy Colored Craft Challenge and have submitted the following items. I sure hope they are liked! 


As part of the challenge, I received 3 yards of each color ribbon - hot pink, orange, yellow and aqua. Then I took my trusty denim apron with scrapbooking patches and decided to give it a face-lift. It sure needed some color!


 Being a certifiable Xyron adhesive junky, I took out my favorite new tool - their Creatopia and replaced the permanent adhesive cartridge with the Fabric Adhesive  cartridge. Using this adhesive will allow me to add the colorful ribbons to my dull and drab apron. Since I'm not big on sewing, this worked amazingly well! It did however,  require a little patience. I took my time setting up the ribbons so that they wouldn't overlap. It was only a slight challenge so I successfully accomplished the task: 


Once the ribbons had the necessary adhesive, I placed them on the apron with small bows to add a bit of charm. Here's the finished product! Now I'm more colorful (or at least my apron is . . .)


 Next I wanted to use up the remaining ribbon so I decided to alter a clipboard. I used Little Yellow Bicycle's  Blue Reverie and Denim Days for the front and Saturday Collage for the back after running them through Xyron's 900 Creative Station. For this project, I used the laminate/permanent adhesive cartridge. I traced the clipboard to the "wrong" side of the papers and cut them using my trimmer and corner rounder. Here's what it looked like going through the Creative Station - simple enough!
  

I LOVE LYB's Saturdays collection! It's so versatile and chic! I feel so "put together" now. What a great feeling!!!
  Final product!


I am really excited to be using these candy colored beribboned accessories here in Southington, CT at the Scrapbooking Memories Spring Crop! What perfect timing!

 Thank you, thank you, thank you for taking the time to look over this blog entry! I'm not sure that it will be a daily thing for me but, who knows? Tomorrow is another day and will have its own gift to share!

Please feel free to comment - I'd love hearing from you!!!
Have a sparkling day! 

Friday, April 13, 2012

I Feel the Need to Embellish!

I love to create things that embellish the moment and make it more memorable. To me, nothing is more satisfying than to have that special something recall a cherished time in your life. Whether it is something simple, like a themed napkin or more elaborate like coordinated favors, table arrangements, arbors and menus, if it serves to make the person or moment special, it's worth the effort! 
From working on my prom decorating committees, creating centerpieces for rooms: 

Junior Prom - "Enchanted Carousel" - I designed and constructed this:

Senior Prom: "On the Eve of a Pineapple Sundae" - I designed and constructed the   room-sized pineapple:

To making hand decorated umbrellas for wedding showers, themed favors, table numbers, centerpieces and other items that I was unable to find in stores. I loved the challenge of making what I couldn't find, using the event to determine the colors and themes!

Here are some of the things I made for my son's wedding last June where the attendants wore purple and carried blue hydrangeas for the ceremony on an Outer Banks, NC beach:


All of these things (and more) were an integral part of my life's moments to be remembered. Their construction was instrumental in the way I coped with the emotions inherent in the events. The creations were a part of the fun and they helped me to be totally immersed in the experience. I hope that they enhanced the experience for everyone in attendance too. I have to mention that, often there were smiles of surprise, which were my greatest reward. I find that most of the time, it's the little things that count just like that special embellishment, placed just so, made the difference!

Now, in retirement, I'm looking to expand my creativity and share what I learn along the way. I would love to have my blog serve as a sounding board for techniques (new and old,) experiences (good and bad) with products and tools of the trade as well as a showcase for my work. Tomorrow I hope to share some of my favorite scrapbooking layouts, albums and one of my most recent endeavors with ribbons. I can't wait to share them with you all. Have a sparkling day!


Where Do I Start?

Where do I begin? What do I want to say? Will people be interested enough to read it? . . . (sigh) . . . What's a retired analyst, wife of almost 40 years and mother of three grown children to do? Questions leading to more questions have been running through my head for days. I'm learning that this is turning out to be a daunting task for me but I'm steadfast in my resolve to do it. I'm joining the "Blog-o-Sphere." 
 I won't waste your time with my rambling thoughts so I'll try to initiate my blog with what I hope is going to be a stabilizing force in my life's journey. A creative outlet to share my thoughts and efforts in one place would be a great source of comfort when life gets chaotic. It also has the potential of connecting me with people of similar experiences while providing me a "stage" or "exhibit hall" to share what I do to creatively cope with life's challenges. I'll be posting my work, sharing what I've learned and hopefully be providing a little entertainment along the way. Here goes nothing! Please join me and feel free to share my blog with others. May we all enjoy the ride together!