Tuesday, May 8, 2012

Using a 6" x 6" album to embellish the arrival of a new baby

Wow time passed by and I hardly noticed! How did that happen? Now, I'm in a real quandary. I remember posting that I would share some Christmas layouts this time around but have yet to photograph them. So . . . how about some 6" x 6" layouts instead? They are quick and relatively easy to do but can really enhance your photos while giving them a singular preference. A downside to using 6" x 6" pages is that they tend to hold only (1) 4" x 6" photo or maybe (2) 2" x 3" photos at best. They wouldn't be the best choice if you have lots of photos to work with but they can be awesome if you have just a select few. 


One of my favorite companies is Little Yellow Bicycle and the collection I used, Baby Safari (2009) had a 6" x 6" pad of paper and specialty die cuts that suited the the smaller format to tee. The embellishments in the collection were oh so adorable too. I loved working with them!


Here are some pages from what I like to call a "coffee table" album (American Crafts - D-Ring 6"x6") that I made for my niece and her husband when their son was born. It contained 2 pages for each of the little guy's 1st twelve months. Using LYB, Bazzill cardstock and a few other things I had in my stash, made the book a true labor of love. 

Here's the cover. Love the Doodlebug Designs - doodle-pops baby boy!

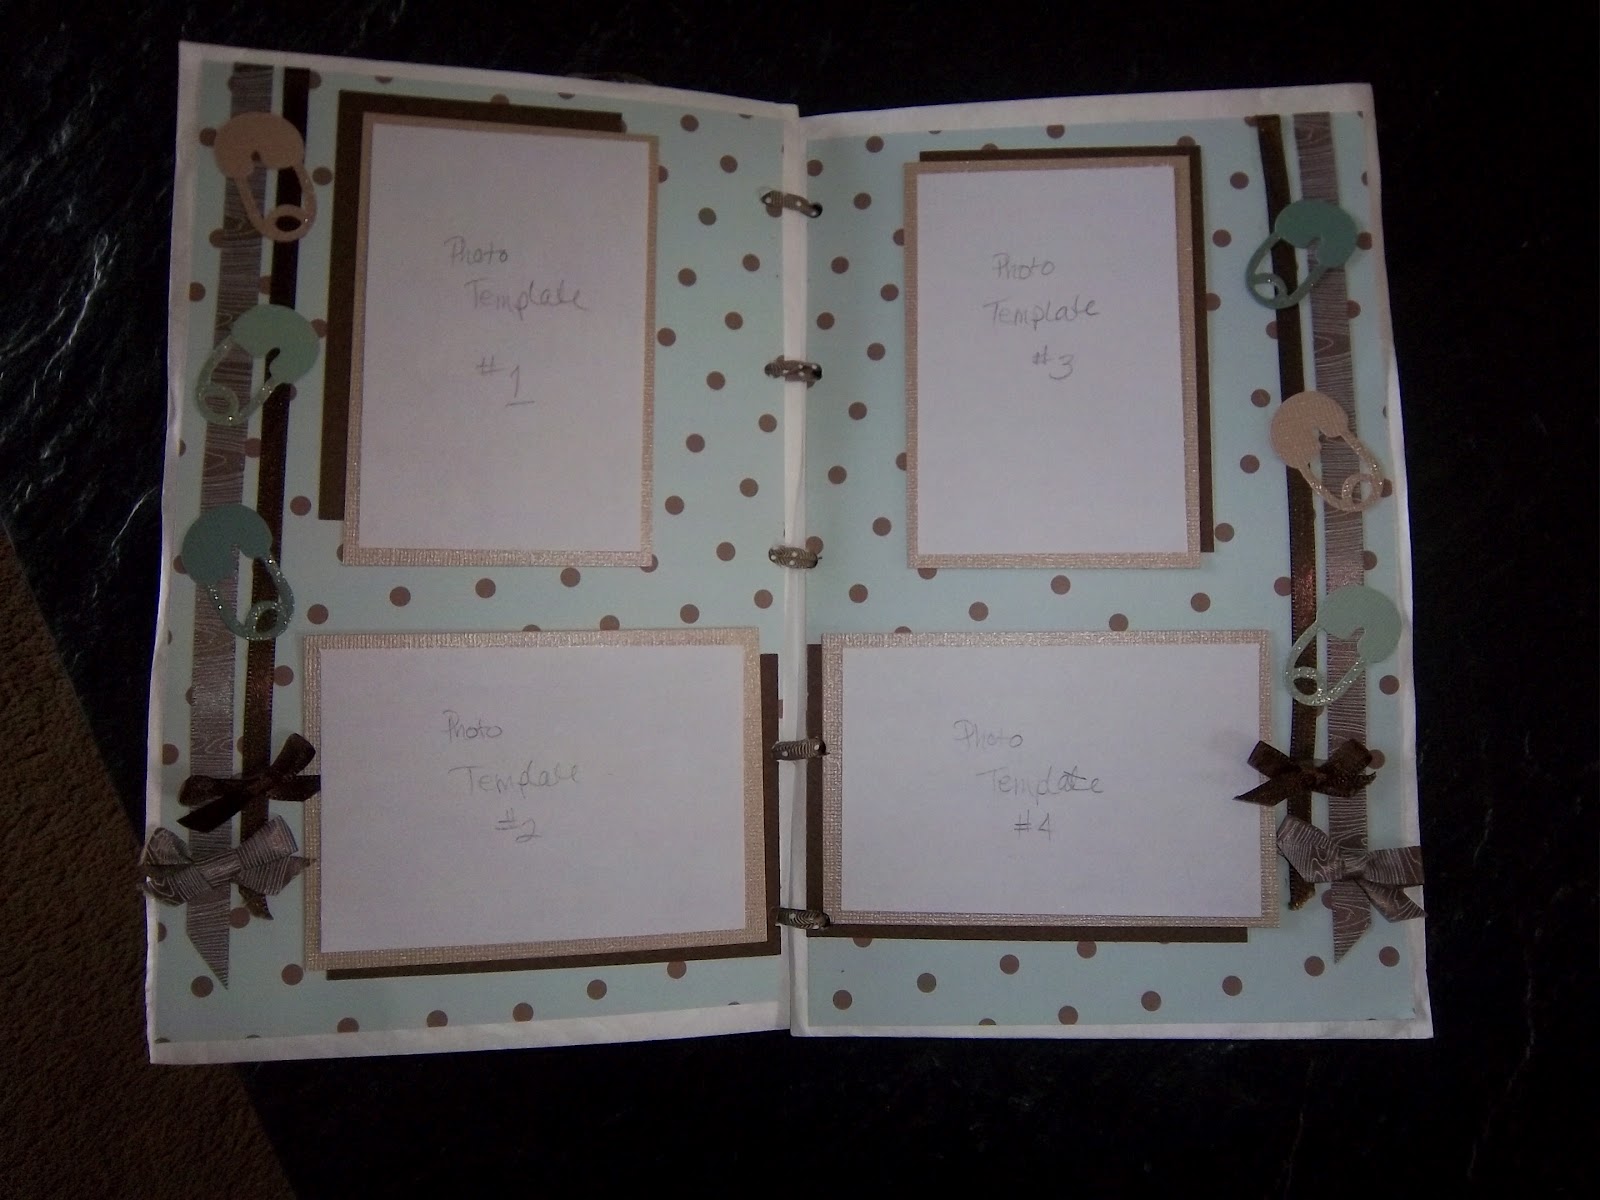
Next is the inside cover and 1st page - I was so happy to be able to start the book for them by using a couple of photos. Filling the rest of the album is something that they can do. 


Each month contains a page with a journaling block for recording an event or special memory that his parents would like to remember, such as, "1st tooth" or "sat up without assistance." 


Each month's numeral and journaling block was different so I had lots of choices to make along the way. The colors I got to use were beautiful!


Since I wasn't sure if my niece was into scrapbooking, I tried to simplify the photo selection process by providing paper templates where a standard 4" x 6" photo would not work. 


I absolutely LOVED the die cut shapes and companion 6" x 6" sheets!


One of my greatest challenges was being non-repetitive with color combinations and placements. You don't get too many options with 6" x 6", that's for sure!


Where I was able to be a little more flexible with the design, I left the choice of photo size up to my niece. She can trim the photo to show some border or leave it  to fill the space. 


I really enjoyed using the fabric stickers on this book! They were such fun! Border punches, helped define photo space too.


Another nice aspect of doing a 6" x 6" album was that I could use some bits of ribbon I had left over from other projects/pages. 


Don't you just love these colors!!!! The small graphics just steal my heart!


 I found that doing the pages out of sequence was helpful in choosing color combinations. I tried very hard not to repeat the basic colors, one after the other.


I was a bit stumped on design when I was working with the 10 month page but was happy when I discovered that I could use the tree trunk pattern on a border strip! How easy was that!


Some pages were very simple.


Using Jolee's embellishment (so happy the cake had 1 candle!) was all that was needed for the 12th month, coupled with the 3-D goldfish sticker from LYB on the photo page!


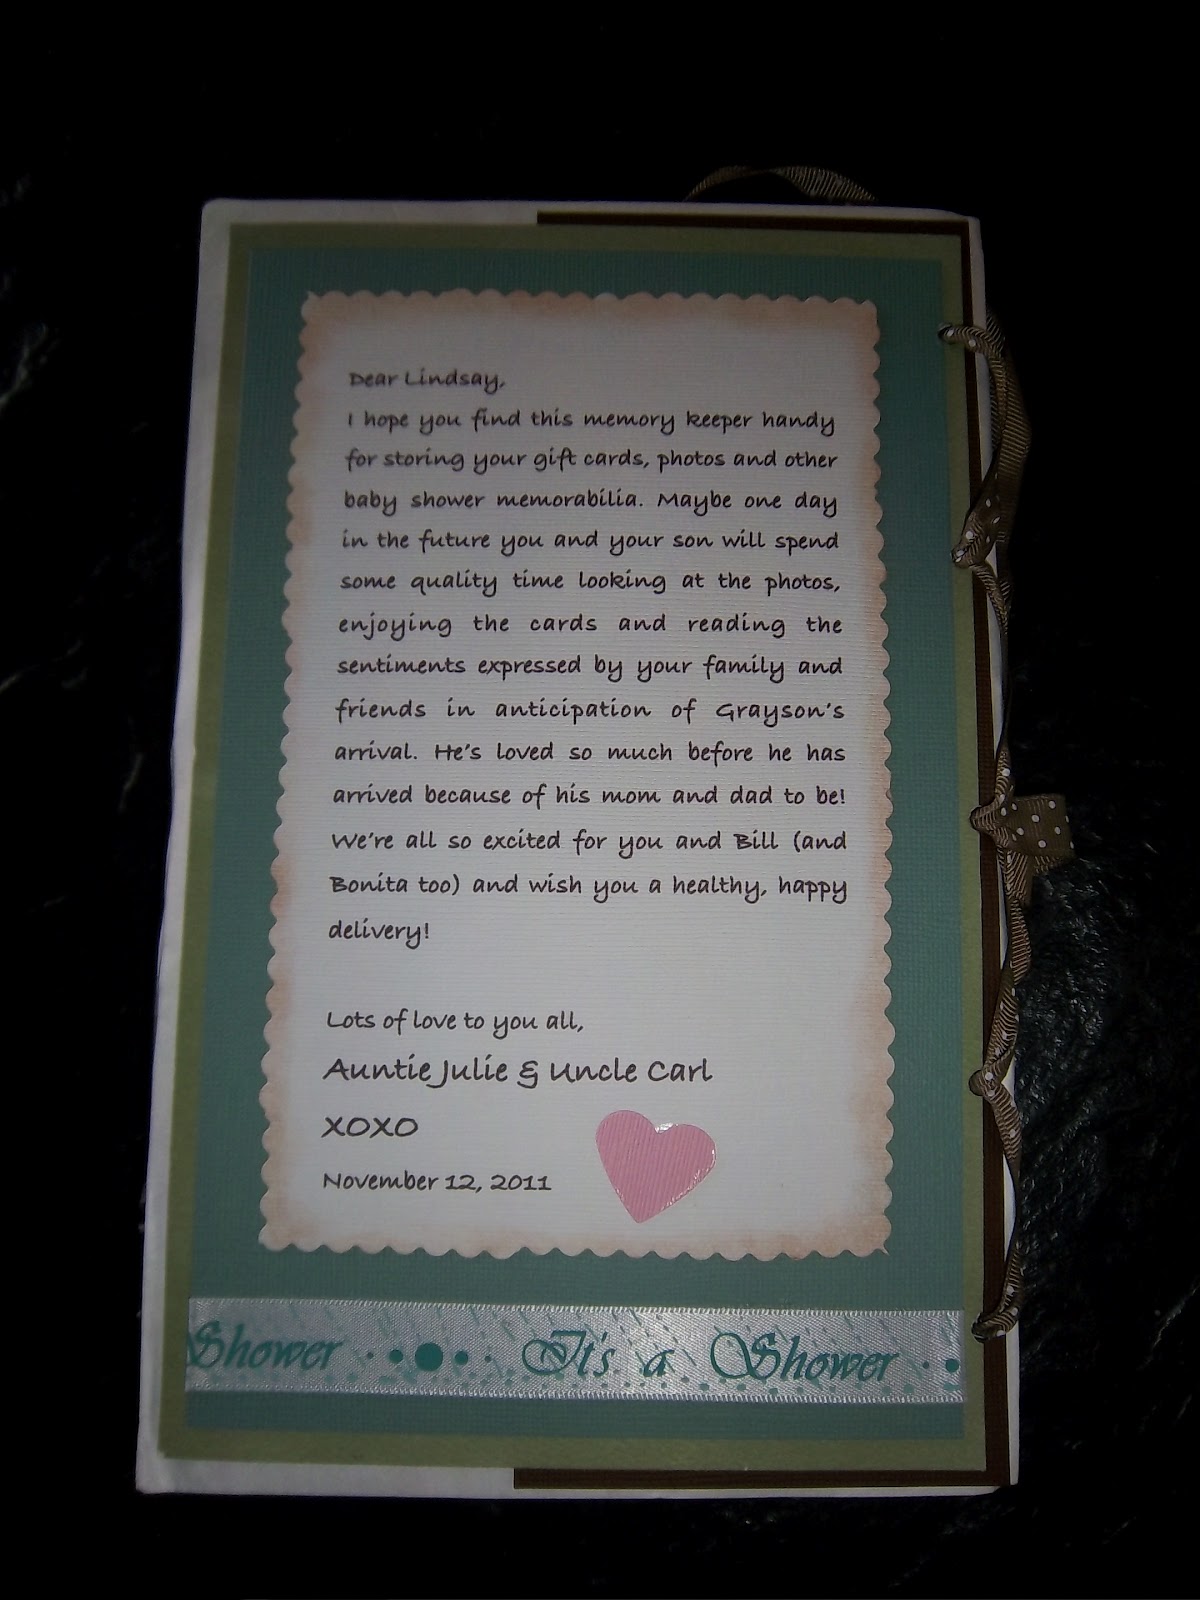
In the past, whenever I made memory books as gifts, I failed to put something of myself into them. I didn't even sign the inside cover. Now I find that to have been an error in judgement, or at least a sad omission. Not everyone who views the memories that I've preserved, will know me or my relationship to the event. I strongly suggest that if you decide to preserve memories for someone other than yourself or your immediate family that you find a way to identify your efforts. 


Even though I do NOT like my handwriting, I decided to make this album a little more personal and hand write my message to the new mommy and daddy. Most of the time I prefer computer journaling to hand-written because it is often easier to read and contains no flaws. Granted, it can be less personal too. When Grayson was born, I could not wait to "fill in the blanks" so to speak. I completed the introductory pages (they were waiting for the details) and my message and then went to meet our newest family member.  I was so lucky to have met my grand-nephew the day after he was born and have my picture taken holding the little bundle of joy! Love him and my photo so . . . it was the perfect embellishment for the final page! Now all is complete. Life is good.


I hope this entry gives you some ideas for smaller albums, as well as, helpful hints for future endeavors. If you're not into making the books, I hope you enjoyed my journey into embellishing the lives of the people I love with a little left over for me. 

I've always said that my scrapbooking, card-making and crafting are my therapy! Bring on the memories! I'm ready for therapy!

Have a sparkling day and watch for my next post. I will keep it a mystery until then!

Wednesday, April 25, 2012

Photos - Life's Embellishments

Wow, time has a way of flying by when you're having fun! Well, the past few days haven't been exactly fun, but, they are behind me now so. . . on to better things! Right? I'm feeling the need to embellish quite strongly today and will soon have to give in to it! I have been scanning my family's slides and have been enjoying my trips down memory lane along with some side trips of my parents. What has been most surprising is the quality of the slides that are more than 60 years old! The colors are still lovely and the scenes are remarkable. Here's a shot taken in Brooklyn, NY after the major snowstorm in December 1948: Nice hats! 
My dad is the guy in the snow holding up my cousin who was 3 at the time. My parents lived in Connecticut but were home visiting for the holidays. Who would have guessed that they would be in store for a week's stay! Aren't the colors still great? I love color!!!!

How about this shot of Niagara Falls from my parents' honeymoon in October 1947, how majestic:

These are the rough copies before any clean-up of dust etc. but I love them just the same. Photos embellish your life as well as record its moments. How wonderful to be able to really look back and see what was seen during another moment in time. They say that time waits for no man but we have photographs to freeze our special moments and I'm ever grateful that I do!

I'm finding inspiration for recording my family's life journey with each box of stray photos I review and will see where they take me in the coming months. I'm afraid that the quality of most of my photos is not the greatest. The 60's and 70's with their Instamatic cameras with cheap lenses, square photos and less than ideal processing have not been kind to memory lane. Tons of orange and bluish - greenish photos filled my photo albums or got that way over time. The albums themselves, were destructive if the magnetic pages were made from the wrong stuff. Who knew? Anyway, I digress. The memories are intact, if not the photos. Thank goodness we have so many ways to "fix" some of the mistakes we made. Now I wish that more of my early married life was documented in slides. They at least, have withstood the test of time. I am blessed with a good memory and each set of pictures or slides that I scan, brings back a rush of memories of happy times and special people who have colored my life. I hope and pray to have them recorded in some way, so that future generations can enjoy visiting the past, see the ancestors and revel in the warmth of family connections.

Next stop  . . . a few recent scrapbook pages created by me to remember Christmas 2007. Stay tuned if you're curious . . . 

Have a sparkling day!!!!


Do you use photos and films to embellish your life too? I am interested in how they affect you too. Please leave a comment!


Thursday, April 19, 2012

Up Next - Scrapbooking Pocket Albums

I've been pondering my next post, maybe too hard and long, but have come to the conclusion that anything new is better than nothing at all! I guess I'm more of a Nervous Nellie regarding this blog than I should be and I need to try to focus on what I love. I love scrapbooking! My next topic will be what I call a pocket memory album. 
 When you have a special event such as a baby shower, bridal shower or  momentous birthday celebration, there are so many items that can be saved as mementos. It is fairly easy to save photos in an album. Or, you can be a bit more creative and make a scrapbook for your photos and cards. However, it can be difficult to read handwritten sentiments, or save that cake topper or other favor and not lose track of it. Roughly a year ago, I was delighted to learn about making pocket albums from a scrappy friend and now I'm hooked! 
  Pocket Albums are simple to make and afford you lots of creativity! The best part is that you control how many pages/pockets that it has, as well as, how big to make it! For this blog I will show you 3 different albums I have made. All were made for baby showers but were unique in their own right. One was for a baby shower where the expectant parents did not want to know the sex of their baby (A), one was for a baby boy (B) and the last for a baby girl (C).
 I used the shower invitations to help me select my color palettes and also, where I found appropriate papers, my page themes.  In the interest of longevity, I selected Tyvek envelopes over paper ones because they are so difficult to tear. Hopefully, they will stand the test of time and usage. The size of the envelope that I preferred was 10" X 13", however, there is no set size to use. The 10" X 13" envelope works out well for storing the larger cards (5"x7") because once you fold them in half, the pages/pockets are 6.5" X 10".  Using 4 or more envelopes, folded in half with the sticky flap cut off, I decorated each page/pocket. I tried to keep about half an inch from the fold clear to allow for punched holes for the ribbon that would bind them together. The pages that became pockets for memorabilia or cards were more stable when I used heavier double-sided papers. To adhere the paper to the Tyvek I chose 1/4" Terrifically Tacky Double-sided tape and applied it to the edges of the paper. On some of the pages I used Xyron's Cheetah (2" and 4" permanent) to apply adhesive on pretty much the whole page for a strong bond. Each envelope provides 1 side that is sealed and one side that is open when folded in half. Be sure to design your pages, keeping in mind the placement of the pockets. I found it easier to place things into the pockets if they were alternated with the sealed pages except for the last page. I tried to keep the pocket side on the inside and not have it be the back page.   To make designing the pages easier, I trimmed the flaps off of all envelopes, then folded them in half and stacked them one on top of the other keeping the pockets alternated. I decorated the pages in order and then punched 5 holes through 2 envelopes at a time using my Crop-o-dile Big Foot. I used the large hole punch and placed the holes equidistant (1" from top and bottom, 3" from top and bottom and in the middle.) Using 3 yards of sturdy ribbon - I like to use grosgrain - lace the pages together criss-crossing between the holes. Start at the top (or bottom) and after lacing to the end slide the ends back up to the middle to be able to wrap them around the album a couple of times to secure the contents. 
I hope these notes are good enough for you to follow. I'm slowly learning how to write down directions so please let me know if they need more clarification! I hope the pictures make them easier to understand.  
Here's (A)


I tried to provide templates for cutting pictures to the proper size on the page.

Here's (B) :


Pockets can be used to hold cards and notes, extra photos, streamers, favorite wrapping papers, etc. And last but not least, (C) :


I would love to hear from you so please drop a note! It's been fun sharing my passion for memories and fun ways to preserve them!
See you next time and have a sparkling day!